How to determine the fermentation time of bread dough or sourdough?
- TOST Corp.

- Mar 24, 2024
- 6 min read
Updated: Mar 29, 2024
In baking there is often a mystery that amateurs and professional craftsmen try to unravel:
“WHAT IS THE RIGHT FERMENTATION TIME FOR BREAD DOUGH OR SOURDOUGH DOUGH?”

In the following you will have access to two important pieces of information
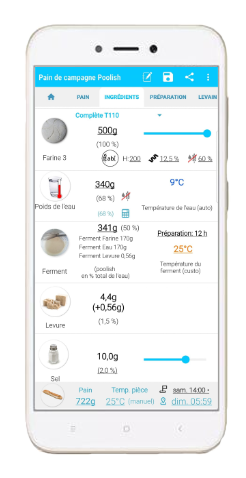
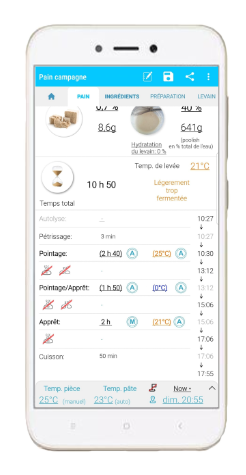
A revolutionary solution with the Android Application “Homemade Bread Recipes”
A chance to offer you real live bakery training
This article will summarize the technical elements of the practice of bread fermentation according to levels of bread making experience: Beginner, Amateur, and Artisan/Pro.
This will allow you to better understand your different, sometimes contradictory, readings on this fascinating subject.
There are generally 3 schools :
that based on the feeling and observation of the dough,
that oriented towards measurement and finally,
the one structured with numbers .
>> These approaches are complementary even if many oppose them.
The question of the fermentation time for the bread that we wish to obtain is complex because many sometimes invisible parameters come into play. Therefore some assert that this time is not predictable and that only observation will give the criteria of END. When you start or when you have a schedule to respect, it is necessary to know how to estimate the time required for each step.
Beginners | need benchmarks

Score : this is the first fermentation with all the dough (before division), it is done in the robot tank, in a tray, in a salad bowl or in a “Tupperware”. Scoring starts at the end of kneading and ends after dividing the dough. Its role is to create the gluten network, to give structure to the dough (elasticity and extensibility) and to multiply the yeasts/bacteria which will make the bread swell (we say that the dough grows). It is during this period that the aromas of the bread develop.
Evolution of the dough during pointing
Observe the smoothing of the dough and the small blisters (CO 2 ) which show the fermentation activity (Glucose -> Alcohol + CO 2 + Heat)
Pointing volume gain


Proofing : this is the final fermentation of the dough pieces (divided pieces of dough) which have been shaped. It gives the final shape to the bread (prepare = ) and is made in Bannetons of various shapes and materials.
Final primer test
Failure to respect proofing and proofing times is the major reason for breads that do not have the quality expected when starting out in breadmaking.
Typical lack of fermentation

As a beginner, hearing or reading "you have to trust your intuition" really doesn't help you gain confidence because by definition a beginner has no experience. Without any reference if to the determination of the fermentation time we add the combinations of the choice of flours, the kneading time, the handling of the dough, the grinding, the temperature and the cooking time it is extremely difficult to move forward calmly.
Anticipating the fermentation time is key to organizing your day. It is important to determine the fermentation conditions before starting your protocol.
Here are 2 tables that can guide the total fermentation time (pointing & proofing).
Fermentation time with yeast
| % yeast / flour | Dough temperature during fermentation | FERMENTATION TIME |
Slow growth | 0.5% | 20 deg. VS | 6:50 a.m. |
| | 25 deg. VS | 4 a.m. |
Tradition | 1% | 20 deg. VS | 4:40 a.m. |
| | 25 deg. VS | 2:40 a.m. |
Standard | 2% | 20 deg. VS | 2:50 a.m. |
| | 25 deg. VS | 1h40 |
Note: constant dough temperature at 70% hydration and 1.8% salt
Fermentation time with Sourdough
| % sourdough / flour | Dough temperature during fermentation | FERMENTATION TIME |
Slow growth | 2% | 20 deg. VS | 9:40 p.m. |
| | 25 deg. VS | 12:30 p.m. |
Tradition | 10% | 20 deg. VS | 3 p.m. |
| | 25 deg. VS | 8:40 a.m. |
Standard | 20% | 20 deg. VS | 12:10 p.m. |
| | 25 deg. VS | 7 a.m. |
Note: constant dough temperature at 70% hydration, 1.8% salt and “young” sourdough

The fermentation time depends, among other things, on the temperature of the dough (and not directly on the ambient temperature). Controlling the temperature of the dough from the end of kneading to grinding (scarification of the dough) is therefore fundamental.

Buy a room thermometer (for the room) and a temperature probe (for the dough)
A SIMPLE & EFFECTIVE solution

Use an Application (available on ANDROID) to do all the calculations for you.
Link to the “Revolutionary” Homemade Bread Recipes Application
Learn more via the App’s website

Video example of using the Application on a recipe

Go to the Homemade Bread Recipe Application Facebook group

The amateurs | need to understand
Here is a magic equation showing the balance of the 3 key parameters of breadmaking. For the same type of flour, the same quantity of salt and the same hydration rate, here is this equation which allows us to understand the link between autolysis, fermentation and kneading times .

AUTOLYSIS x FERMENTATION x KNEADING = CONSTANT
In graphic form, here is the balance of the 3 parameters with the size of the blue circles.

There are two types of action
Mechanical = milling/kneading/turning (slap, fold, stretch, lamination)
Chemical = autolysis and fermentation
Concretely this means that if we increase the kneading time, we will have to reduce the fermentation time. Likewise, if we have a significant autolysis/fermentolysis time, this will automatically reduce the fermentation and kneading time.
At the center is salt, water and flour as they all play a role in driving fermentation.
Salt slows down fermentation (in long sourdough fermentation you can reduce the salt to better express the flavors of the flour and the sourdough)
Water basically translates to hydration rate which when it increases reduces the fermentation time. We could add hygrometry in the “water” part
The type of flour is fundamental (mainly the protein level) because this allows for long fermentation. A T45 with 8.5% protein will degrade very quickly under the effect of the leaven and the dough will collapse and tear. For the flour, we would have to add the Hagberg falling rate and this adds a lot of complexity.
To better understand all these mechanisms, a course is available for beginners but also those who are more advanced in sourdough breadmaking.
Give yourself the opportunity to succeed and become an enlightened amateur
Watch this 1.5 hour live course to understand simply and in depth the mechanisms of fermentation and bread-making.

➊ Learn the basics of fermenting bread dough
➋ Understand the influence of temperatures on your recipe
➌ The steps of making your bread in a domestic environment
Let’s take a look at the perspective of baking professionals.
Professionals | need for repeatability
Professionals have a simple objective to maximize their profit within their allocated work window. To do this, you have to sell your merchandise and control these margins.
To sell your products you also need aspects not linked to bread-making (place of sale, marketing, store, salespeople, etc.), make a successful batch (produce with the quality adapted to the target clientele), release it to time and ultimately have an attractive price
Having an attractive price is made possible by managing your margins. If we freeze the cost of raw materials and the fixed operating costs of the bakery, the main thing will come down to the creation of the right manufacturing process (1) and the accuracy of its execution (2) . These two parameters will make it possible to obtain bread with a quality adapted to the needs of the sale and completely controlled margins.
Let's analyze two extreme cases
If you take the large industrial bakery brands, the manufacturing processes and ingredients are calibrated and the baker has no room for creativity. He will follow "charts" without understanding what is happening. These ingredients and their strict protocols integrate what is needed to be fault tolerant and easy to work with (flour developing a high level of gluten, improvers, anti-blister, large proofing chambers, ultra-flexible oven and large capacity, etc.).
The little authentic Artisan will work with sourdough, with flours that are not very tolerant of faults, without additives or improvers, with more limited materials (because of the high costs and lack of space) and certainly a wood-fired oven. From now on he is without a net, he will make bread all terrain. His know-how will be the essential thing that will allow him to produce all these batches on time and at good quality. He will have to master all the parameters from the bread-making of the ingredients, to the manufacturing process, to the protocol, including of course the fermentation times.
Given the number of real Artisans in France, you will quickly understand that a professional with an orientation on volume and average to low quality will not be able to help you make bread at home.
Some very good and well-known bloggers will probably help you initially but quickly you will stagnate in understanding fermentation phenomena.
In fact, these professionals work in bakeries and do not see the problems of an amateur, for example:
An oven that doesn't really reach 250 degrees
No steam blast with a button on the oven
No growth chamber with regulated temperature and humidity
A dough weight of 500 g to 1 Kg whose temperature varies a lot compared to a professional who makes 20-30 Kg of dough in one go
However, there are high quality training courses like that of the EIDB or one-day sessions in a traditional micro-oven.
Some professionals manage to bridge the gap between quality, volume and tradition; they are rare but really worth the time you can spend with them.
To your bakeries at home!


Excellent ! Well done and very clear.